Tuesday 31 July 2012

Crispy Bacon and Custard Creams.

Now from the title I'd forgive you for thinking I'd gone and ruined perfectly good custard cream biscuits with bacon, that is not the case. It just so happens that today I cracked the art of frying bacon to a golden crisp and made some custard cream biscuits.


Perfectly fried bacon
Not to be confused with the soft, back bacon used for a proper English fry up, this is smoked streaky bacon that has been slowly fried to a crisp.
I wanted to have shards of bacon in my tabouleh salad for lunch so I did a bit of research and here are my top tips for perfectly fried, crispy, streaky bacon.


1) Start with a cold pan. Don't put the bacon into a hot pan, especially if it is rind on bacon, this just makes all the meat tighten up and cause it to curl.


2) Use a medium to low temperature. You are essentially rendering the fat out of the bacon and slowly cooking/drying it out. 


3) Turn frequently. When the bacon starts to sizzle you want to be turning every 45 seconds or so. This ensures an even colour all over.


4) Mop up and remove excess fat. When you notice the fat rendering out of the bacon it's time to remove it by tilting the pan and using absorbent kitchen roll to mop it up. A small sheen of fat on the pan is good, but the bacon shouldn't be swimming in it. For three rashers I used in total about 4 sheets of kitchen roll oh and use tongs, not your fingers, to do this.


5) Take your time. It's true what they say, good things come to those who wait. Well this takes time, any quicker than around 5 minutes and you're doing it wrong. It of course depends on the thickness of your bacon to begin with and the fat:meat ratio in the strip but go for 5 minutes as a ball park minimum and you'll be okay.


If you follow these rules then you will end up with some golden, crispy rashers of bacon that you can dry on absorbent paper and then crumble into a salad. Very much worth the time taken to cook them. 


New pans!
When I get the chance and a stray tenner in my pocket I like to browse through charity shops for second hand gems. I get it from my Dad, growing up I'd often go to the local car boot sale with him to look for what is now oh-so-trendily entitled as 'vintage kitchenalia'. I'm a sucker for 'vintage kitchenalia', be it a Hornsea coffee set, 1980's Tupperware or cast iron pans.

Imagine then the excitement I felt when walking into a charity shop in Monmouth I saw, for a total of 15 quid, these two Le Creuset pans.


Squashing down the bubbles of disbelief, I picked them up and hastily walked to the till and paid for them. Now I am the proud owner of two, volcanic orange, Le Creuset pans. They already have a lifetime of use and now will get another lifetime of use. They didn't have lids but that's not big deal. I can always find a lid on ebay or just get a generic replacement. It doesn't need to be the same brand, the lids aren't what conduct the heat so beautifully. 

Keeping with the volcanic orange theme, I discovered on Etsy.com (my new favourite place to browse for inspiration) a Fat Lava glazed mug.
Surely this is something I need to work at when I start my 27 week pottery course in September. 
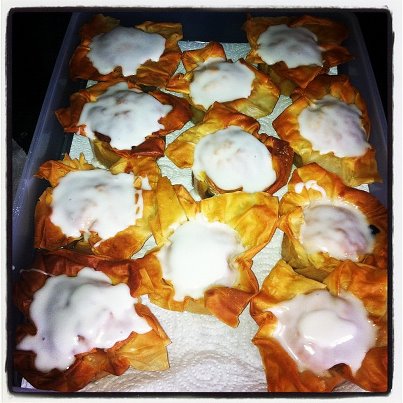
Custard Creams


Custard creams are perhaps my favourite biscuit of all time, so much so that I tend to call them custard dreams. If you are unfamiliar with them think Oreo but with with a custard flavour and colour. They are pretty amazing really and a pack of 50 won't last more than a day with me around so I've taken to making my own. For some reason I'm slightly more reserved when I've taken the time to make them... only just mind. The recipe I use is based on one from Nigella Lawson's Feast book. She makes them as love heart biscuits, I have removed that saccharin association and plumbed for a basic fluted round.


For the biscuit, put into a bowl the following: 175g plain flour, 50g vegetable shortening, 50g butter, 3tbsp of birds custard powder, 1tsp baking powder, 3tbsp caster sugar. 
Rub these together with your fingertips until they resemble bread crumbs. Don't worry if some of the fat is in largish lumps, my experience with pastry suggests that when you chaff the crumbs into a dough it will come together and smear through the paste. 
Mix one egg with 1tbsp of milk and add them to the dry. Bring it all together to a crumbly dough and turn out on to a work top. 
Using both hands quickly chaff the dough into a smooth paste. You're looking for a Playdough texture. Wrap this in clingfilm and refrigerate for 20 mins. 
Meanwhile turn on the oven and warm it to 180C (160 if fan assisted). Line two baking sheets with baking paper.
After 20 minutes, remove the dough from the fridge and dust a rolling pin and surface with flour. Roll out to 4mm thickness. Cut out as many rounds as you can, bring the scraps together, re-roll and cut until you have used it all up.


Bake these for 10 minutes, keep an eye on them as they brown quickly; move them around in the oven if needed. I'm sure you know how your ovens work so I'll leave that to your discretion. Cool on a wire wrack. 
As you can see some of mine got a little more brown than I would have liked. It's no big deal though, they still taste good. I've stacked them in pairs for the most part so each on you see here is one complete biscuit. 


Now for the cream filling.
Cream together 50g of soft butter with 1tbsp of custard powder and 100g of icing sugar. When it forms a stiff paste add a little boiling water (about 1tsp) and mix to a smooth filling.
Sandwich two halves together with the cream filling and you're done.
Home made custard creams, far superior to those bought in a shop!


I wonder if adding cocoa instead of custard powder is all you need to do to make them into bourbons?


Wednesday 25 July 2012

Gooseberry Curd

I'm staying with my parents in the Forest of Dean and the weather has improved hugely. It seems that as the summer holidays have begun the sun has decided to come out. Perfect weather for fruit picking and a spot of light weeding in the family garden. The fruit patch is a bit of a jungle, black currants fight against the gooseberries for space and light and the raspberries are hogging almost half of the patch with thick trucks of raspberry canes; it makes for difficult picking, especially when the best gooseberries are in the centre of the briar.
Licking my wounds I weighed my haul and found I had just shy of 2lb of the hairy tart fruits.


A quick google search later and I had found a recipe for gooseberry curd and typically I didn't follow it to the T. I topped and tailed the gooseberries and popped them into a large saucepan with a glug of water and brought to a buoyant boil, letting them burst.
I quickly realised that I had put a bit too much water into the pan so I drained it off and the gooseberry pulp that was left I blitzed with a hand blender. I reserved the cooking water to add back to the pulp if I needed to slurry it up a bit. This pulp I then pushed through a sieve to remove the seeds and then the resultant gooseberry puree was spooned into a jelly bag and hung up with a collecting bowl underneath.

I wonder if the effort I went to just to get 200ml of gooseberry juice was worth it, it was time consuming and I confess that to speed things up I did squeeze the jelly bag, a cardinal sin in jelly making as it makes the jelly cloudy, but I'm not going for a clear jelly here but a curd so I figured it was okay.

When this 200ml of gooseberry juice was ready I popped two bonne maman jam jars into the oven without their lids, and turned the oven on to 150C, letting it warm up and sterilise the jars.

I weighed out 3.5 oz of unsalted butter and put it into a pyrex bowl set over a pan of barely simmering water. When this had completely melted I added 80z of golden caster sugar and the berry juice. This was heated until the sugar had dissolved and then 2 whole eggs and 1 egg yolk (kindly supplied by my parents chickens), were added to the pan and whisked quickly. Apparently the trick to not ending up with scrambled eggs is to keep the heat low and keep stirring, well I did that and had no trouble with chunks of egg white in the curd.

This mixture was then heated until it had thickened, this took AGES and I had to keep stirring it all the time, I ended up looking at websites for hints about when it's ready. Jam is ready when a drop is put on a chilled plate and you move it with a finger to see if it has set, I tried that with the curd and it didn't work. I guess this is because it sets slowly in the fridge, like custard. I used a jam thermometer to reach a temperature of 75C which, according to the joy of baking is the temperature at which the curd is done.

When it was ready I poured it into the jam jars, it made 1 and half in total and then put it into the fridge.

It was delicious!

If I'm honest though, the phaff of making the gooseberry juice was such that I probably shan't make it again, but I won't ever begrudge a high price for it at a farmers market. It does open up the concepts of curds made with all kinds of fruit juices, not just lemon!

Sunday 1 July 2012

Elderflower and Blueberry cupcake pies.

This is true alchemaic baking, inspired by a reduced to clear item at Sainsbury's. They had some filo pastry reduced to 90p so I picked it up, along with my odd collection of things (it wasn't a planned trip you see) and spent the rest of the time walking about the shop just thinking about what I could do with it.

Elderflower-Bluberry cupcake pies.
Stay with me, I know what you are thinking, cake in a pie? Yes please! Well they tasted really good, have no paper cake cases to throw out (so eco-friendly???) and here is the recipe for you. 

First make a basic 2 egg sponge mix.

Cream together 4oz of butter with 4oz of soft brown sugar until it is light and fluffy. Break 2 eggs into the mixture, stirring well after each egg. Then sift in 4oz of Self-raising flour and mix until just incorporated, try not over mix. At this point I glugged in 3 sloshes of elderflower cordial. I know they aren't precise measures so basically just add it a bit at a time until you can taste the elderflowers. The flavour isn't terribly strong so don't worry if it's slight, it's more of an accent in the cake, as vanilla would be, the icing is where the flavour really is.


Unwrap the filo pastry, and spread out each sheet on a cleaner worktop. Brush it with melted butter and then put the next sheet over the top. Brush again with melted butter and add a final sheet. 

Taking a sharp knife, cut the large, 3-layered sheet of filo into 6 squares/rectangles. Use each to line the holes in a  muffin tin, repeat this for the last 6 holes so you have a 12 hole tin lined with filo pastry. Brush the edges with more melted butter.
Put in 1 tsp of sponge mix into each case, then pop in 4 blueberries and 1tsp of sponge mix more on top. Bake at 180C for about 15 minutes or until the sponge is golden brown and springy to the touch.

Remove from the oven and allow to cool, then take them out of the tin.

Make a quick glace icing, using 175g of icing sugar and slosh in elderflower cordial until you have an icing which coats the back of a spoon. Drizzle it over each cake/pie and let it set.

Then enjoy!

I took them to a play read-through today and the director and rest of the cast really enjoyed them! Have a go, they are very Summery and if you took away the icing you could serve them warm with custard (everything tastes better with custard I say).  Another twist would be to make a frangipani sponge using ground almonds, and make a Bakewell version.